There’s something truly magical about watching a child immerse themselves in the world of art. From tiny scribbles to elaborate imaginative scenes, the process of creating offers endless opportunities for growth, self-expression, and pure joy. If you’ve been wanting to introduce more art into your child’s life but aren’t sure where to start, you’re in the right place! We’ll explore why making art with children is so important and how you can foster a love for creativity in your own home.
Why Art Matters for Little Minds
Art isn’t just about making pretty pictures; it’s a powerful tool that helps children develop in countless ways. When kids engage in artistic activities, they’re not just having fun – they’re building essential skills.
- Boosts Creativity and Imagination: Art is a playground for the imagination! It encourages children to think outside the box, experiment with new ideas, and bring their unique visions to life. There are no “right” or “wrong” answers in art, which frees them to explore without fear of judgment.
- Develops Fine Motor Skills: Holding a paintbrush, squeezing glue, or cutting paper all help to strengthen those small hand muscles. These fine motor skills are crucial for tasks like writing, dressing themselves, and so much more.
- Enhances Problem-Solving: What happens if I mix blue and yellow? How can I make this tower stand up? Art naturally presents opportunities for children to experiment, observe, and find solutions to creative challenges.
- Encourages Self-Expression: Art provides a safe and wonderful outlet for children to express their feelings, thoughts, and ideas, especially before they have the words to articulate them. It’s a way for them to tell their story, big or small.
- Builds Confidence: Every stroke of a crayon, every blob of clay, is a small victory. Completing a piece of art, no matter how simple, gives children a sense of accomplishment and boosts their self-esteem.
Simple Ways to Invite Art into Your Home
You don’t need a fancy studio or expensive supplies to make art with your children. The key is to create an inviting and open-ended environment where exploration is encouraged.
- Start with the Basics: You might already have many art supplies around the house! Think crayons, markers, paper, glue, child-safe scissors, and even recycled materials like cardboard tubes, egg cartons, and fabric scraps.
- Embrace the Process, Not Just the Product: This is perhaps the most important tip! For children, the joy is often in the “doing,” not necessarily in the finished masterpiece. Focus on their engagement, their discoveries, and their unique approach, rather than aiming for a perfect outcome. Resist the urge to “fix” their art or make it look a certain way.
- Offer Open-Ended Materials: Instead of craft kits with step-by-step instructions, provide materials that can be used in many ways. A blank canvas (or just a piece of paper!) and a variety of colours can spark endless possibilities.
- Make it Accessible: Designate a special “art spot” where supplies are easily accessible. A small table, a dedicated drawer, or a clearly labelled bin can encourage spontaneous creative moments. Don’t worry if it gets a little messy – that’s often part of the fun!
- Join in the Fun (Sometimes): While it’s important to let children lead their own artistic journey, sometimes joining them can be a wonderful bonding experience. Draw alongside them, ask open-ended questions about their art (“Tell me about what you’re making!”), but try not to dictate what they should create.
- Rotate Materials: To keep things fresh and exciting, you can rotate the art supplies you offer. Bring out paints one week, then switch to playdough and cookie cutters the next. This keeps curiosity piqued.
Creative Adventures: Vegetable and Fruit Printing!
Did you know your kitchen can be an amazing art studio? Vegetables and fruits aren’t just for eating; they can create incredibly unique and fun stamp prints! This activity is fantastic for exploring shapes, textures, and colours.
What you’ll need:
- Vegetables and fruits: Think apples, potatoes, celery, carrots, bell peppers, broccoli, or citrus fruits. The more variety, the more interesting your prints will be!
- Paint: Acrylic or fabric paint works best for vibrant results.
- Paper or fabric: Choose your desired surface for printing.
- Paintbrushes or a brayer: For applying paint evenly.
- Paper plates or palettes: To hold your paint.
- Paper towels: Crucial for blotting excess moisture.
- Sharp knife: For adults only! To cut the produce into desired shapes.
- Optional embellishments: Markers or cotton swabs for adding extra details.
Let’s get stamping!
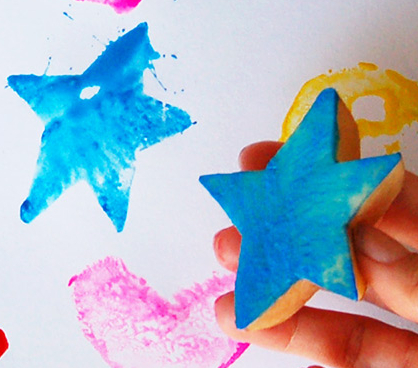
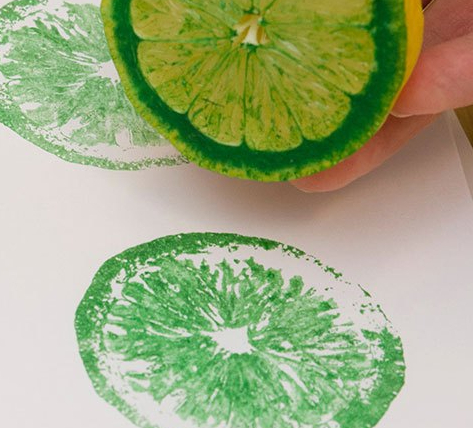
- Prep your produce: An adult should carefully cut the vegetables and fruits. Think about cutting them in half, or into interesting shapes to reveal cool patterns – like the star in an apple! You can even cut a potato into geometric shapes.
- Prep your paint: Pour your chosen paint colours onto paper plates or a palette.
- Blot, blot, blot! This is key for clear prints. Use paper towels to gently press on the cut surface of your produce to remove any excess moisture. This stops the paint from becoming too watery or blurry.
- Apply paint: Use a paintbrush or a brayer to spread a thin, even layer of paint onto the cut surface of your vegetable or fruit.
- Stamp your design: Firmly press the painted surface onto your paper or fabric, applying even pressure.
- Lift and reveal: Carefully lift the produce to see your unique print!
- Repeat and create: Keep experimenting with different produce, colours, and how you press them. You’ll be amazed by the variety of designs you can make.
Little Bites of Creativity (No knives needed!)
For younger children, or if you want to avoid knives entirely, you can still embrace the “carving” concept! If a child wants to create their own unique shape from a soft vegetable, they can bite into it to create the shape they want for stamping.
And here’s another fun idea: try brushing paint onto the leaves of a cabbage or lettuce, and then pressing them onto paper for beautiful, textured prints! The natural veins of the leaves create incredible patterns.
Tips for best results:
- Use a variety of produce to get different shapes and textures.
- Experiment with different paint colours and how you apply the paint.
- Remember, blotting prevents watery, blurry prints.
- Don’t be afraid to embrace imperfections and the natural variations that appear in the prints – that’s part of the charm!
- Feel free to add extra details to your finished prints with markers or other embellishments once they’re dry.
Making art with children is a journey of discovery, growth, and connection. It’s an opportunity to celebrate their unique perspectives and to foster a lifelong love of creativity. So, gather some supplies, embrace the mess, and enjoy the beautiful process of making art with your little ones!

Leave a comment